


Hello all! Are you all as incredibly excited about the Holidays as I am? This time of year is always so exciting, the baking, the eating, all the beautiful decorations - it truly is the most wonderful time of the year. What better way to commemorate this time in your child's life than with pictures of them at some of their first ever Christmas's? I have found that each year is getting more and more exciting with Isla, it's like it's her first time all over again and she's understanding more and more. But honestly, most of us can't afford a $300 photo session every time our kid hits a milestone. It's just not feasible for our family, so I decided to do it myself! This photo session cost me nothing but a Christmas dress, and with a little planning you can create different landscapes to commemorate these different milestones in your child's life.
1. Pick a spot
Lighting is so important! Try to pick a blank wall in your home that has the best lighting. Be sure to plan your photos during midday so you get ample lighting and avoid casting shadows.
2. Setup your backdrop
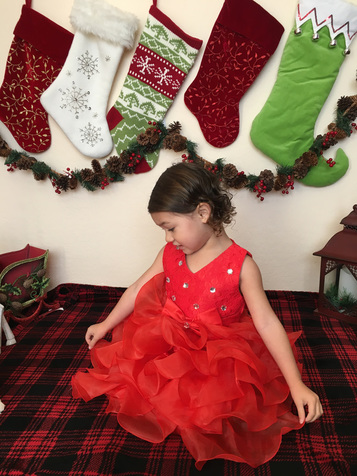
I used command hooks to hang up our family's stockings, notice that they are very low to the ground. Before starting, have your child stand or sit at the wall where you'll be taking your photos and take a test photo. Place a garland just above their heads or hang your stockings at a height where they will be clearly visible in your photos.
3. Place a blanket on the floor. Choosing a lighter blanket is always better, keep the photos as bright as possible. I didn't have my faux fur throw blanket or else I would have used it! It would have been dreamy, but this plaid one works just fine.
4. Add props
Pick out your favorite Christmas decorations and place them on the sides of your landscape. Take another test photo to ensure you'll capture them and move around the decorations to make the picture symmetrical. Below is my test picture, notice the decorations are too far away. I moved them in closer and it fixed the problem.
1. Pick a spot
Lighting is so important! Try to pick a blank wall in your home that has the best lighting. Be sure to plan your photos during midday so you get ample lighting and avoid casting shadows.
2. Setup your backdrop
I used command hooks to hang up our family's stockings, notice that they are very low to the ground. Before starting, have your child stand or sit at the wall where you'll be taking your photos and take a test photo. Place a garland just above their heads or hang your stockings at a height where they will be clearly visible in your photos.
3. Place a blanket on the floor. Choosing a lighter blanket is always better, keep the photos as bright as possible. I didn't have my faux fur throw blanket or else I would have used it! It would have been dreamy, but this plaid one works just fine.
4. Add props
Pick out your favorite Christmas decorations and place them on the sides of your landscape. Take another test photo to ensure you'll capture them and move around the decorations to make the picture symmetrical. Below is my test picture, notice the decorations are too far away. I moved them in closer and it fixed the problem.
5. Enlist some help
We had two sick babies while taking this shoot, and neither of them were being very cooperative at the time. Get grandma or your hubby to help make funny faces and chase the babies while you hold the camera.
6. Bribe, bribe, and bribe some more
We used MnM's and fruit snacks. Do what works mama!
We literally got this together in an hour with zero planning or coordination and took the photos with my iPhone. If you have a fancy camera, put it to use! I would love to see any photos and landscapes you create, use #diywithEGW and I'll feature my favorites on my blog and Instagram!
 RSS Feed